Install Cassandra windows Distribution is very easy on windows platform as well as on Linux Environment. After Installation of Cassandra on windows platform you can access Cassandra nosql database by using DevCenter (a user Interface application for Cassandra) as well as cqlsh shell on CMD. This tutorial will completely explains how to Install Cassandra on Windows platform along with cqlsh and java environments to work with Cassandra nosql db.
What is in this Cassandra installation tutorial?
- Pre requisite for cassandra Installation
- Download and Installation of JDK on windows.
- Step By step Installation of cassandra on Windows Environment
Prerequisite for Cassandra Windows Installation
- Linux Environment is needed
- JDK must be installed
- Download the Apache Cassandra Community edition. From apache website.
https://academy.datastax.com/planet-cassandra/cassandra
Downloading and Installing Java (JDK)
Java or JDK is the first most important prerequisite for Apache Cassandra Installation. In First step, verify either java is already Installed or not in your system. For this purpose below mentioned command is used. Open CMD in Windows run the following command.
$ java -version
If Java is already installed in your system the command will return the following output
java version "1.8.0_74"

Java(TM) SE Runtime Environment (build 1.8.0_74-b02)

Java HotSpot(TM) 64-Bit Server VM (build 25.74-b02, mixed mode)
If you didn’t get the above response it means java is not installed on your system. Now follow the below mentioned steps to install java on your system to Install java.
Step 1
- Download java (JDK <latest version> – X64.exe)
- To download Java latest version. Click Here
I assume you have downloaded jdk-8u201-windows-x64.exe this file in your PC.
Step 2
Generally the downloaded file is placed in download folder. Verify the downloaded file as well double click the file to install it.
Step 3
Now use the java -version the very first command on the terminal to check whether
Download And Installation of Cassandra:
Cassandra can be downloaded from official apache website. To download Cassandra latest version. Click here.
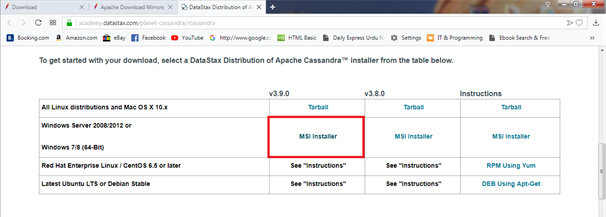
Keep in mind that you have downloaded the community edition.
Run the Datastax community edition setup file. If you are able to run successfully following pages appear. I am using the 64 bit version and attaching the screenshots of 64 bit version that is being installed. User can download and Install the 32 bit Cassandra version in the same way. But the recommended version is Cassandra windows 64 bit.
Cassandra Installation step:
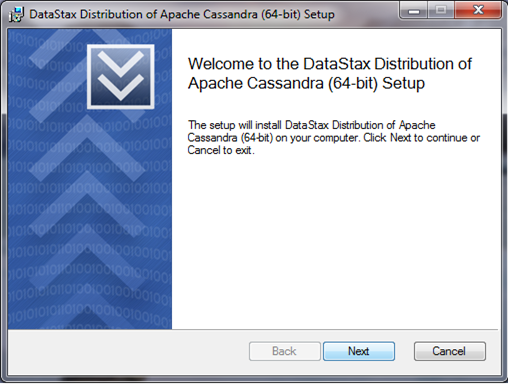
This window tells about the version etc of cassandra you are installing on your windows machine. This is the very first window appear after you double click the installer file. Click the “Next” Button.
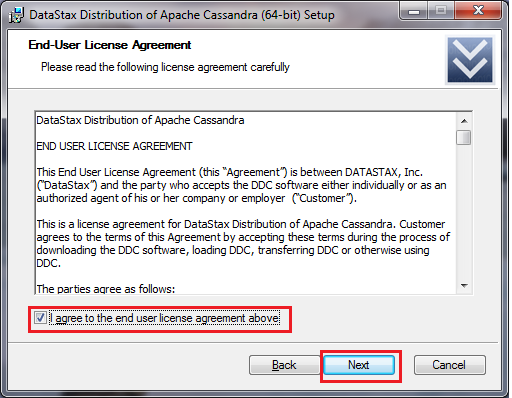
This is about the License agreement of Apache Cassandra windows version. You must have to agree with it if you want to precede your Installation further. Check the checkbox which is red circled in above figure. And then Click “Next” Button.
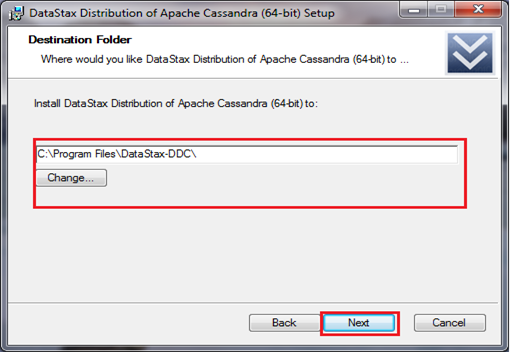
The above window asks you about the Installation directory. By Default a Directory is selected form your C drive. You may change the Installation Directory or let it install in Default directory.
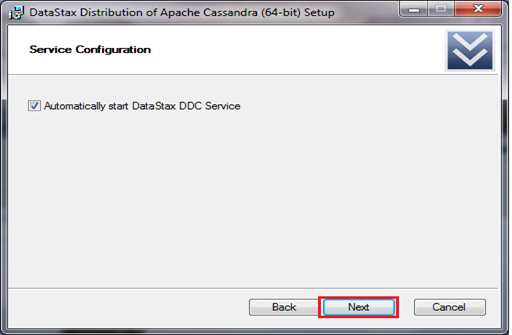
Datastax run as a service in your windows machine. And the above window it ask you whether you want I to configured automatically or not. If you want then check the checkbox and click next.
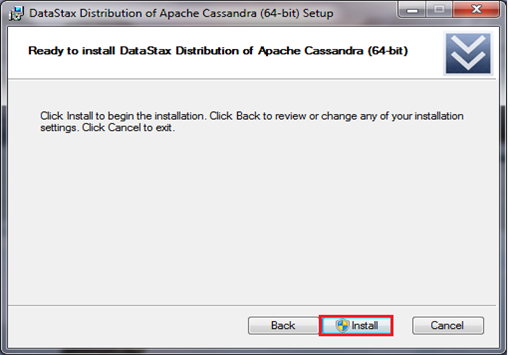
Now the win came is showing that the entire configuration is complete. And Cassandra is ready to install. Just click the red marked “install” button. And let it complete the Installation.
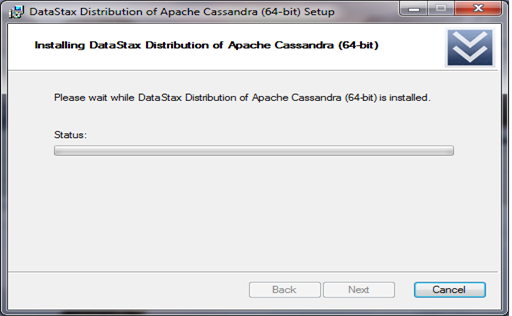
The above windows show you the Installation Progress in a progress bar.
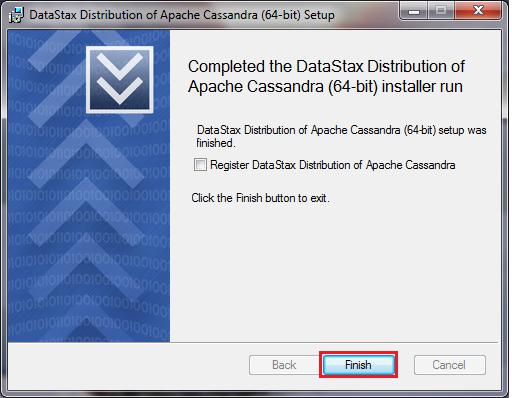
The windows below is the window appear during the cassandra Installation. This shos that the cassandra Installation is completed on your Windows machine. And you are ready to fly with it.
Access Cassandra on windows Using CQL Shell:
A user can now access the Cassandra using CQL shell. For this Go to windows start programs and search for “Cassandra CQL Shell” and run it. After running Cassandra CQL shell, user will see the following command line
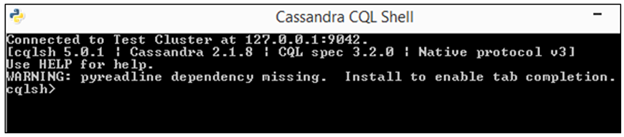
By using this Shell you can do all the operations with cassandra. Lke Create keyspace, create table, Drop a table or truncate a table. Any thing you want to do.
Summary:
A user can Install Cassandra and deploy a complete Cassandra Cluster using this step by step tutorial. This is Complete step by step Cassandra windows Installation tutorial.
2 Replies to “Download & Install Cassandra Windows : Step Step Process”
Comments are closed.