Cassandra Security 2019: Create, Drop User & Authentication with JMX
Cassandra Security aspect is very essential where the data is of sensitive nature. So this tutorial explains the security procedure and other aspects linked with security of Cassandra nosql database.
There are two main aspects of Cassandra security or the security of any other database engine. The types are listed below.
- Internal Authentication
- Authorization based on object permission management
In this Article explain you the following things in detail,
- Internal Authentication based on internally controlled rolename/passwords
- Authorization based on object permission management
- Configure Authentication
- Authorization
- Logging in
- Create New User
- Authorization
- Configuring Firewall
- Enabling JMX Authentication
Internal Authentication Cassandra
Validate the user connection is called Internal authentication in cassandra. The authentication is done using user login and password. Cassandra manage user accounts internally.
Internal Authorization Cassandra
Different type of permissions or privileges for a user in cassandra security setting are dealt in internal authorization. It tells what a specific user can do and what cant. The example is, you can grant a user permission to only read the Cassandra data, or who can write and alter the database or can perform the delete operations
However, there is also a way to control authentication externally with help of Kerberos (it is basically used to manage user credentials) along with LDAP (it is used to store account authoritative information, like what data the user is allowed to access).
A user can grant authorization to authorize other user roles. Roles can be granted to users. CQL commands GRANT and REVOKE are used to manage roles of individual users.
Configure Authentication and Authorization
By default the authentication and authorization is disabled in cassandra configuration. The configuration file in cassandra is ‘cassandra.yaml’. you have to change this file for enabling the cassandra authentication and authorization.
Open “Cassandra.yaml” file in your respective directory and uncomment lines that are related with internal authentication and authorization.
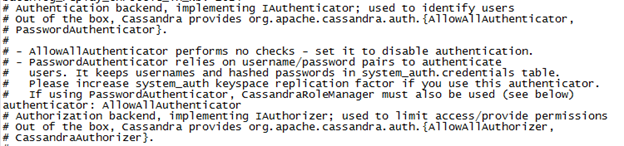
- In this configuration file, authenticator value is set to ‘AllowAllAuthenticator’ by default.
- Change the authenticator value to ‘com.datastax.bdp.cassandra.auth.PasswordAuthenticator’ for password authentication.
- Similarly, in yaml file, authorizer value is ‘AllowAllAuthorizor’ by default.
- Change this value from to ‘com.datastax.bdp.cassandra.auth.CassandraAuthorizor’.
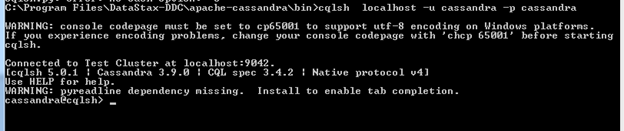
Logging in to cassandra
At this stage you have enabled authentication. Now if request to access a keyspace, an error will be returned by Cassandra.
In apache Cassandra nosql there is a super account with user name ‘cassandra’ and also password ‘cassandra’. A user can do anything by logging in to this Cassandra super account. User have all the privileges who logged in by this account.
Here is the error returned from Cassandra when you not provide the cassandra by default username ‘cassandra’ with the password ‘cassandra’.

The second snapshot depict the scenario when you are using the by default username and password. And you are successfully logged in.
The best practice is to change the default password.
Syntax for change of password
alter user cassandra with password 'new password';
Create New User
User can also create a new user with this by default super account ‘cassandra’.
For the purpose of creating the new user name, along with the password is specified whether the user is super (having all the privileges) user or not. Only Super user have the permission to create new users.
Syntax for Creating New User in Cassandra
create user Obama with password 'michel' superuser;
create user Michel with password 'obama';
here is screenshot shows the procedure of creating new user an listing down all the users in cassandra.
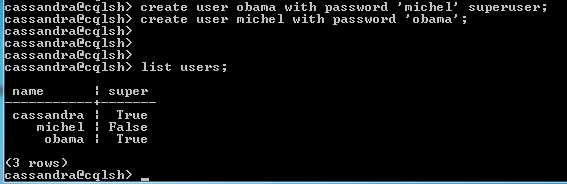
Syntax for List All Users
list users;
Drop User in Cassandra
You can drop any user by using the super user account. The screenshot shows the procedure to drop users.
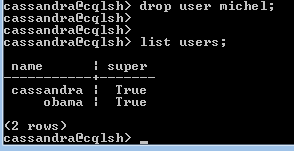
Syntax for Drop User
drop user Michel;
Authorization
Authorization in Cassandra security is the process of assigning permission to already created users that what action a cassandra user can perform.
Generic Syntax for Granting Permissions to Users
GRANT permission ON resource TO user
There are following types of permission that can be granted to the user.
- CREATE
- SELECT
- ALTER
- Modify
- ALL
- DROP
- AUTHORIZE
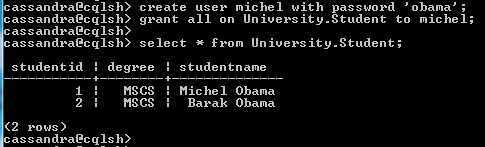
Syntax for Granting Permission to Users
Create user Michel with password 'obama';
grant all on University.Student to michel;
revoke all on University.Student from michel;
grant select on University.Student to michel;
A new user ‘michel’ is created with password ‘obama’.
Listing all permission of user
Here is the process of listing all the permission of a user.
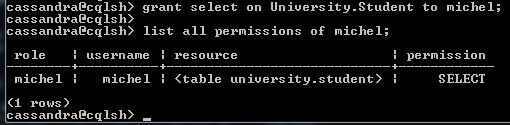
Syntax for Listing All Permission of a User
list all permissions of Michel;
User can also get list of all the permission on some specific resource in Cassandra security setting. Here is the syntax to get permission list on a table.
list all permissions on University.Student;
Configuring Firewall for Cassandra security
Make sure the following ports including some Cassandra ports must be opened for communication (if your firewall is running). Cassandra uses these ports for communication between nodes. If ports will not be open, apache Cassandra nodes will work as standalone database server rather than joining the Cassandra cluster.
Cassandra Client Ports
| Port Number | Description |
| 9160 | Cassandra Client Port Thrift |
| 9042 | Cassandra Client Port |
Cassandra Internode ports
| Port Number | Description |
| 7000 | Port for Cassandra inter node communication |
| 7001 | For Cassandra SSL inter node communication |
| 7199 | Cassandra JMX monitoring port |
Opscenter Public Ports
| Port number | Description |
| 8888 | Opscenter web browser http request |
| 22 | SSH Port |
Cassandra OpsCenter Ports (For Cassandra Health Monitoring)
| Port Number | Description |
| 61620 | OpsCenter monitoring port. |
| 61621 | Cassandra node Opscenter agent port |
Enabling JMX Authentication for Cassandra Security
With the default security settings of Cassandra, the only way to access the JMX is from local host. If a user wants to access Cassandra JMX remotely, following changes are required in Cassandra configuration.
Change the LOCAL_JMX setting in Cassandra-env.sh file and enable SSL or authentication.
After enabling JMX authentication in Cassandra-env.sh file, make sure that OpsCenter and nodetool are configured to use authentication.
Procedure for enabling JMX Authentication
There are following steps for enabling JMX authentication.
Step1
In cassandra-env.sh file, update or add the following lines.
JVM_OPTS="$JVM_OPTS -Dcom.sun.management.jmxremote.authenticate=true"
JVM_OPTS="$JVM_OPTS -Dcom.sun.management.jmxremote.password.file=/etc/cassandra/jmxremote.password"
Step 2:
Change the LOCAL_JMX setting in Cassandra-env.sh
LOCAL_JMX=no
Step 3:
Copy the file jmxremote.password.template from location /jdk_install_location/lib/management/ to location /etc/cassandra/ and rename file to jmxremote.password.
cp />jdk_install_dir/lib/management/jmxremote.password.template /etc/cassandra/jmxremote.password
Step 4:
Change ownership of the file jmxremote.password to the current user you run Cassandra with and change file permissions to read only. Th syntax is given below
chown cassandra:cassandra /etc/cassandra/jmxremote.password
chmod 400 /etc/cassandra/jmxremote.password
Step 5:
Edit the file jmxremote.password and add the user and password for JMX-compliant utilities as
monitorRole QED
controlRole R&D
cassandra cassandrapassword
Step 6:
Add the current Cassandra user with write and read permission to /jdk_install_location/lib/management/jmxremote.access
monitorRole readonly
cassandra readwrite
controlRole readwrite \
create javax.management.monitor.,javax.management.timer. \
unregister
Step 7:
Restart Cassandra
Step 8:
Run nodetool with your Cassandra username and password. Syntax is given below
$ nodetool status -u cassandra -pw cassandra
Summary
This Article explains Cassandra security in multi prospects. As well as configuring Cassandra configuration file “Cassandra.yaml” for enabling security setting of Cassandra nosql database. Along all the above it also explain the step by step procedure that how to create new user in cassandra, how to grant permission to some specific user, configuration of firewall for Cassandra machines, and so on. In short this is a comprehensive article on complete cassandra security setting.