Cassandra Health Monitoring by Datastax Opscenter 2019
This article is about Cassandra Health monitoring tool that is Datastax Opscenter 2019 latest version . In this tutorial you will learn how to install Datastax Opscenter a Cassandra health monitoring tool. And how to configure it on Ubuntu 16.04 as well as on windows and a live demo of Cassandra Health monitoring.
In this tutorial you will learn
- How to Download Datastax Opscenter for cassandra heath monitoring
- Complete step by step installation guide of Opscenter 2019
- Datastax Opscenter Configuration
Download Datastax Opscenter 2019 latest Version
To download Datastax Opscenter for cassandra. Click here
About Datastax Opscenter
Datastax Opscenter is Apache Cassandra health monitoring tool. A user or Big data administrator can easily monitor and configure all cassandra operation using this Opscenter tool. This tool is specially developed for database administrators as well as the software architects and operators.
In large productions environment, there are thousands of servers and cassandra nodes. And it is very difficult almost impossible for database administrators to monitors these servers individually. Here it come the need of some automated health monitoring tool. It enables a user to watch the status all machines and Cassandra nodes. Just sitting on single machine and single screen. It has a web based GUI. It popup Alert whenever some node goes down exactly identify the down server.
Installation of Datastax Opscenter
This is a step by step process that how to Install Datastax Opscenter and how to Configure Opscenter.
Pre-Requisites for Datastax Opscenter Installation
- User must have Installed Cassandra enterprise server and start Cassandra for Opscenter installation.
- User have Downloaded the Correct version of Opscenter setup for Linux.
Step for Opscenter Installation:
Place the Opscenter in desired directory on desired linux Machine
1: Open terminal using alt+ctrl+t
2: Cd “OpsCenter Directory”
3: Make the file installable using the command.
Chmod +X DataStax OpsCenter -5.x.x
4: Execute the file
./DataStax OpsCenter -5.x.x ……………..
The below screen will appear.
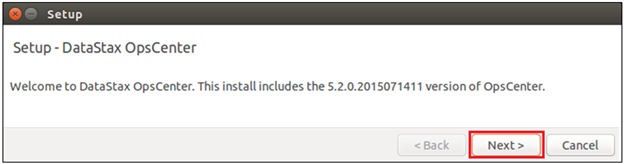
Click the next button.
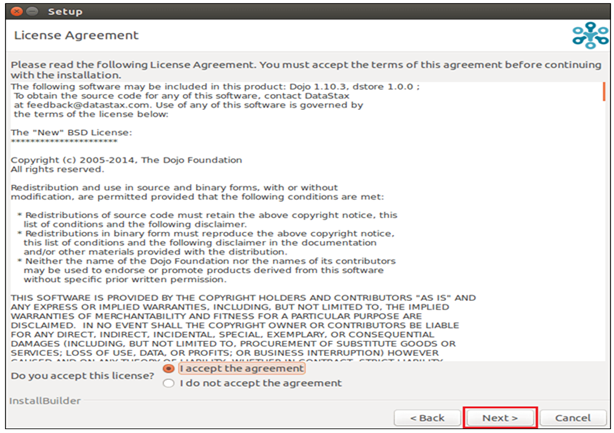
Accept the License agreement and Click the Next Button.

- Select the simple install.
- Select yes or no based on your own preference. If you want to update your machine then click yes, else no.
- Here is the broadcast IP of your machine. Give same as you give to cassandra
- Click the next Button after complete configuration.
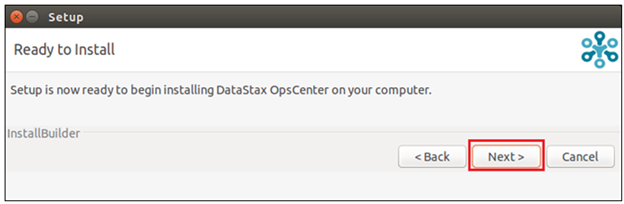
After the above process this screen will be shown. It means that you had completed the initial configuration or settings and the setup of Datastax Opscenter is ready to install. So click the Next button and install it.
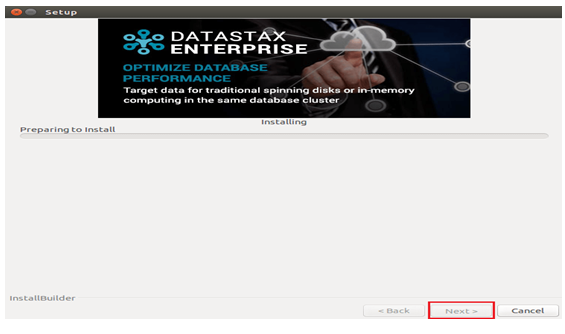
When you start installing, this screen will appear. It means that installation is in process. Wait for few minutes to complete installation.

After the installation is complete this screen will appear. Uncheck all checkboxes and click Finish.
At this stage you have successfully downloaded and installed the Datastax Opscenter.
Now it’s time to make it operational. For this purpose, Use the following commands.
Uninstall Datastax Opscenter
- Open terminal using command Alt+Ctrl+t
- Cd OpsCenter
- ./uninstall
Step by Step Process to Start Datastax OpsCenter :
Step 1:
- Open terminal using command Alt+Ctrl+t
Step 2:
GO to installed Opscenter Directory.
- Cd OpsCenter
Step 3:
Start Opscenter using this Command.
- bin/OpsCenter

Step 4:
Access the Opscenter Interface by using the following Instructions.
- Go To Following URL on Browser to verify OpsCenter “ http://172.16..8.1:8888/”
Step by Step Process to Configure Datastax OpsCenter:
Step1:
The first step is to start the Datastax agents on each Cassandra Node. Datastax agent setup is already installed with cassandra. User just need to start them by using the following command.
- Open terminal using command Alt+Ctrl+t
- Cd dse
- ./datastax-agent/bin/datastax-agent
Follow these steps on each Cassandra node one by one.
Step 2:
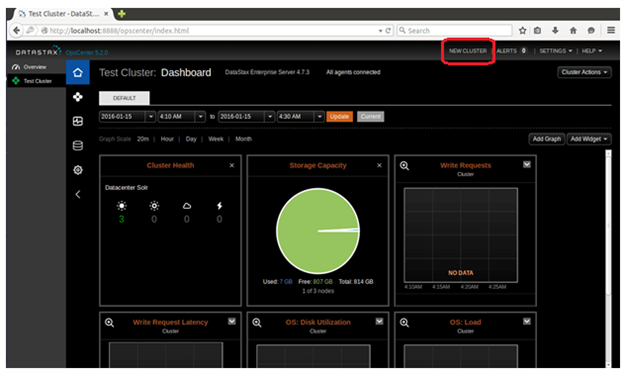
Open the Opscenter in web browser. click the red squared hyperlink to add your Cassandra Cluster in Datastax Opscenter.
It will prompt the following screen
It will shows the following screen
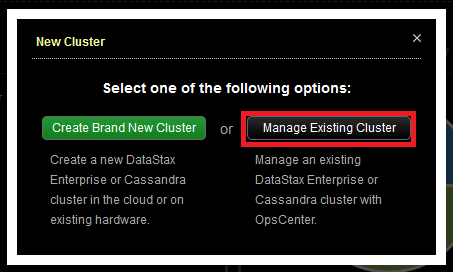
Click “Manage Existing Cluster”. It will display you to another screen.
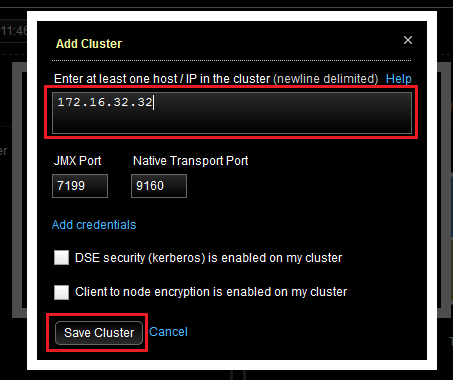
Enter the IP address of any of your Cassandra Node in textbox and hit “save Cluster”.
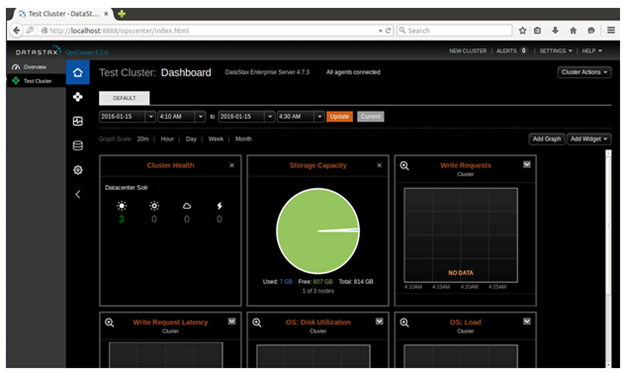
At this stage you successfully added a cluster in Datastax Opscenter. It will start showing you the statistics and alters of Opscenter.
Summary
This Article explains the complete step by step process of Download and installation of Datastax Opscenter 2019. Explains the process of Cassandra health monitoring.